Introduction:
A Bastion host is a special-purpose computer on a network, used as a "jump box" to access other hosts on the network.
Assumptions:
This guide assumes you already have terraform installed and configured as an environment variable so it can be run from anywhere.
Architecture:

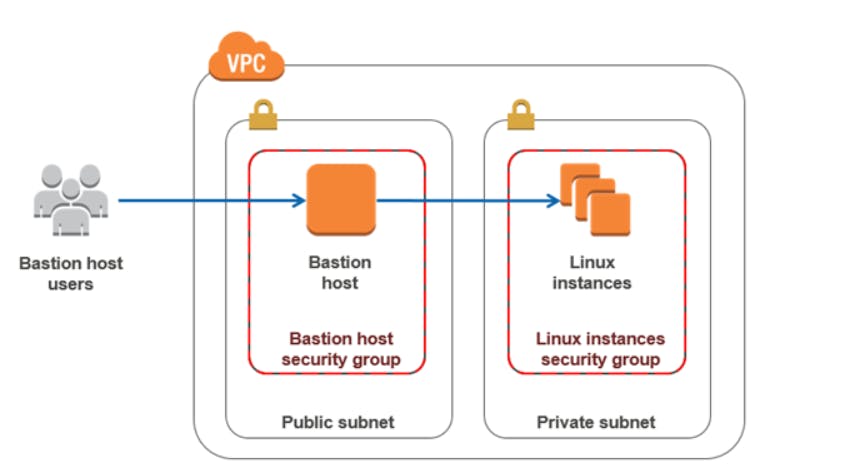
NB: Users of the Linux instances will have to pass through the bastion host to access their instance.
Terraform Coding:
The terraform code is going to be in separate files, but before coding, I always generate my ssh key using the command:
First
ssh-keygen -f mykey
This works on PowerShell(Windows) as well as Linux, above I use "mykey" as the key name.
The Terraform files:
The first file I create is a terraform variable file named vars.tf . In it, I define the default region, the path to the private key and the public key I created above and a map type, mapping the regions to Ami's.
variable "AWS_REGION" {
  default = "eu-west-1"
}

variable "PRIVATE_KEY" {
  default = "mykey"
}

variable "PUBLIC_KEY" {
  default = "mykey.pub"
}

variable "AMIS" {
  type = map(string)
  default = {
    us-east-1 = "ami-13be557e"
    us-west-2 = "ami-06b94666"
    eu-west-1 = "ami-844e0bf7"
  }
}
Next, I create the versions.tf file which gives the version of terraform in use:
terraform {
  required_version = ">= 0.12"
}
I then create a provider.tf file which specifies which cloud provider terraform is going to work with, In our case, it is going to be Amazon Web Service.
provider "aws" {
  region = var.AWS_REGION
}
Notice we specify the region in which we will deploy by referring to the variable in vars.tf file AWS_REGION whose default variable is EU-west-1.
We create a key.tf file, this file creates a key resource and references our created key on the vars.tf file.
resource "aws_key_pair" "mykeypair" {
  key_name   = "mykeypair"
  public_key = file(var.PUBLIC_KEY)
}
The vpc.tf file is next. In it, we will create our vpc resource that will contain our entire network, a public subnet that will contain our bastion host and a private subnet resource that will contain the private instance, an internet gateway to give internet access to our public subnet, a route table for our vpc and finally a route table association resource to associate our route table to the public subnet.
# Internet VPC
resource "aws_vpc" "main" {
  cidr_block           = "10.0.0.0/16"
  instance_tenancy     = "default"
  enable_dns_support   = "true"
  enable_dns_hostnames = "true"
  enable_classiclink   = "false"
  tags = {
    Name = "main"
  }
}

# Subnets
resource "aws_subnet" "public" {
  vpc_id                  = aws_vpc.main.id
  cidr_block              = "10.0.10.0/24"
  map_public_ip_on_launch = "true"
  availability_zone       = "eu-west-1a"

  tags = {
    Name = "public"
  }
}


resource "aws_subnet" "private" {
  vpc_id                  = aws_vpc.main.id
  cidr_block              = "10.0.20.0/24"
  map_public_ip_on_launch = "false"
  availability_zone       = "eu-west-1a"

  tags = {
    Name = "private"
  }
}


# Internet GW
resource "aws_internet_gateway" "igw" {
  vpc_id = aws_vpc.main.id

  tags = {
    Name = "main"
  }
}

# route tables
resource "aws_route_table" "main-public" {
  vpc_id = aws_vpc.main.id
  route {
    cidr_block = "0.0.0.0/0"
    gateway_id = aws_internet_gateway.igw.id
  }

  tags = {
    Name = "main-public"
  }
}

# route associations public
resource "aws_route_table_association" "main-public-1-a" {
  subnet_id      = aws_subnet.public.id
  route_table_id = aws_route_table.main-public.id
}
The next file is the security group file securitygroup.tf, in which we create two security group resources. The first is the security group for the bastion which allows any incoming ssh connections(ingress) from any ipv4, and outgoing connection (egress) to any IP on any port, The second is the security group for the private instance, which allows ingress only from the previous(bastion host) security group and egress to any ip on any port.
resource "aws_security_group" "bastion-allow-ssh" {
  vpc_id      = aws_vpc.main.id
  name        = "bastion-allow-ssh"
  description = "security group for bastion that allows ssh and all egress traffic"
  egress {
    from_port   = 0
    to_port     = 0
    protocol    = "-1"
    cidr_blocks = ["0.0.0.0/0"]
  }

  ingress {
    from_port   = 22
    to_port     = 22
    protocol    = "tcp"
    cidr_blocks = ["0.0.0.0/0"]
  }
  tags = {
    Name = "bastion-allow-ssh"
  }
}

resource "aws_security_group" "private-ssh" {
  vpc_id      = aws_vpc.main.id
  name        = "private-ssh"
  description = "security group for private that allows ssh and all egress traffic"
  egress {
    from_port   = 0
    to_port     = 0
    protocol    = "-1"
    cidr_blocks = ["0.0.0.0/0"]
  }

  ingress {
    from_port   = 22
    to_port     = 22
    protocol    = "tcp"
    security_groups = [ aws_security_group.bastion-allow-ssh.id ]
  }
  tags = {
    Name = "private-ssh"
  }
}
The last file is the instance.tf in which we create our bastion instance and our private instance.
resource "aws_instance" "bastion" {
  ami           = var.AMIS[var.AWS_REGION]
  instance_type = "t2.micro"
  subnet_id = aws_subnet.main-public-1.id
  vpc_security_group_ids = [aws_security_group.bastion-allow-ssh.id]

  key_name = aws_key_pair.mykeypair.key_name
}

resource "aws_instance" "private" {
  ami           = var.AMIS[var.AWS_REGION]
  instance_type = "t2.micro"
  subnet_id = aws_subnet.private.id
  vpc_security_group_ids = [aws_security_group.private-ssh.id]
  key_name = aws_key_pair.mykeypair.key_name
}
Creating the Infrastructure
This command as well as the ssh-keygen command above should be run on the terraform root directory. ie The folder in which all the above terraform files, and keys are.
When you are done writing the code go to the specified file and type:
terraform init
This will initialize the working directory, the next command is:
terraform plan
Which will give you a detailed overview of all the tasks to be accomplished. The next and final command is:
terraform apply -auto-approve
Which will create your infrastructure
To test this code we can ssh to our public instance, and then from our public instance to the private instance, using the command:
ssh -i mykey <user>@<ip_address>
Destroying the Infrastructure:
Use command:
terraform destroy -auto-approve
to destroy all the created infrastructure.
This is
